Use the System File Checker tool to repair missing or corrupted system files

1.Windows 7 or windows Vista

To do this, click Start, type Command Prompt or cmd in the Search box, right-click Command Prompt, and then click Run as administrator. If you are prompted for an administrator password or for a confirmation, type the password, or click Allow.


2.At the command prompt, type the following command, and then press ENTER:
                              sfc /scannow


The sfc /scannow command will scan all protected system files, and replace corrupted files with a cached copy that is located in a compressed folder at %WinDir%\System32\dllcache. 
The %WinDir% placeholder represents the Windows operating system folder. For example, C:\Windows.

Note Do not close this Command Prompt window until the verification is 100% complete. The scan results will be shown after this process is finished.

3.After the process is finished, you may receive one of the following messages:
  • Windows Resource Protection did not find any integrity violations.

    This means that you do not have any missing or corrupted system files.
  • Windows Resource Protection could not perform the requested operation.

    To resolve this problem, perform the System File Checker scan in safe mode, and make sure that the PendingDeletes and PendingRenames folders exist under %WinDir%\WinSxS\Temp.
  • Windows Resource Protection found corrupt files and successfully repaired them. Details are included in the CBS.Log %WinDir%\Logs\CBS\CBS.log.

    To view the detail information about the system file scan and restoration, go to How to view details of the System File Checker process.
  • Windows Resource Protection found corrupt files but was unable to fix some of them. Details are included in the CBS.Log %WinDir%\Logs\CBS\CBS.log.

    To repair the corrupted files manually, view details of the System File Checker process to find the corrupted file, and then manually replace the corrupted file with a known good copy of the file.

How To Reset a Windows 7 Password


If you need to reset the password to Windows 7 on your computer, likely because you've forgotten it, let me first assure you that not only is this very possible, it's not even that difficult.
Unfortunately, aside from a password reset disk (discussed in Step 14 below) there is no Windows-provided way to reset a Windows 7 password. Luckily, there is the clever password reset trick I've outlined below that's easy enough for anyone to try.
Prefer screen shots? Try my Step by Step Guide to Resetting a Windows 7 Password for an easy walk-through!
If you do know your password and just want to change it, see How To Change Your Windows 7 Password for help with that.
Follow these easy steps to reset your Windows 7 password:
Difficulty: Average
Time Required: Due to the several steps involved, it could take 30 to 60 minutes to reset your Windows 7 password
Applies To: Any edition of Windows 7, including both 32-bit and 64-bit versions.

How To Reset a Windows 7 Password

  1. Insert either your Windows 7 installation DVD, or a Windows 7 System Repair disc, into your optical drive and then restart your computer. If you have either on aflash drive, that'll work too.

    Tip: See How to Boot From a CD, DVD, or BD Disc or How to Boot From a USB Device if you've never booted from portable media before or if you're having trouble doing so.

    Note: If you don't have original Windows 7 media and never got around to making a system repair disc, don't worry. As long as you have access to any other Windows 7 computer (another in your home or a friend's will work fine), you can burn a system repair disc for free. See How to Create a Windows 7 System Repair Disc for a tutorial.
     
  2. After your computer boots from the disc or flash drive, click Next on the screen with your language and keyboard choices.

    Tip: Don't see this screen or do you see your typical Windows 7 logon screen? Chances are good that your computer booted from your hard drive (like it normally does) instead of from the disc or flash drive you inserted, which is what you want. See the appropriate link in the tip from Step 1 above for help.
     
  3. Click on the Repair your computer link.

    Note: If you booted with a system repair disc instead of a Windows 7 installation disc or flash drive, you won't see this link. Just move on to Step 4 below.
     
  4. Wait while your Windows 7 installation is located on your computer.
     
  5. Once your installation is found, take note of the drive letter found in the Locationcolumn. Most Windows 7 installations will show D: but yours may be different.

    Note: While in Windows, the drive that Windows 7 is installed on is probably labeled as the C: drive. However, when booting from Windows 7 install or repair media, a hidden drive is available that usually isn't. This drive is given the first available drive letter, probably C:, leaving the next available drive letter, probablyD:, for the next drive - the one with Windows 7 installed on it.
     
  6. Select Windows 7 from the Operating System list and then click the Next button.
     
  7. From System Recovery Options, choose Command Prompt.
     
  8. With Command Prompt now open, execute the following two commands, in this order:
    copy d:\windows\system32\utilman.exe d:\ 
    copy d:\windows\system32\cmd.exed:\windows\system32\utilman.exe 
    To the Overwrite question after executing the second command, answer with Yes.

    Important: If the drive that Windows 7 is installed on in your computer is not D:(Step 5), be sure to change all instances of d: in the commands above with the correct drive letter.
     
  9. Remove the disc or flash drive and then restart your computer.

    You can close the Command Prompt window and click Restart but it's also okay in this situation to restart using your computer's restart button.
     
  10. Once the Windows 7 logon screen appears, locate the little icon on the bottom-left of the screen that looks like a pie with a square around it and then click it!

    Tip: If your normal Windows 7 logon screen did not show up, check to see that you removed the disc or flash drive you inserted in Step 1. Your computer may continue to boot from this device instead of your hard drive if you don't remove it.
     
  11. Now that Command Prompt is open, execute the net user command as shown, replacing myusername with whatever your user name is and mypassword with whatever new password you'd like to use:
    net user myusername mypassword 
    So, for example, I would do something like this:
    net user Tim 1lov3blueberrie$ 
    Tip: If your username has spaces, put double quotes around it when executing net user, as in net user "Tim Fisher" 1lov3blueberrie$.
     
  12. Close the Command Prompt window.
     
  13. Login with your new password!
     
  14. Create a Windows 7 Password Reset Disk! This is the Microsoft-approved, proactive step you should have done a long time ago. All you need is a blank flash drive or floppy disk and you'll never need to worry about forgetting your Windows 7 password again.
     
  15. While not required, it would probably be wise to undo the hack that makes this work. If you don't, you won't have access to accessibiily features from the Windows 7 login screen.

    To reverse the changes you've made, repeat Steps 1 through 7 above. When you have access to Command Prompt again, execute the following:
    copy d:\utilman.exe d:\windows\system32\utilman.exe 
    Confirm the overwrite and then restart your computer.

    Important: Undoing this hack will have no impact on your new password. Whatever password you set in Step 11 is still valid.

Tips & More Information

  1. Having trouble resetting your Windows 7 password? See Get More Help for information about contacting me on social networks or via email, posting on tech support forums, and more.

How To Find Your Windows 7 Product Key


If you're preparing to reinstallWindows 7 you will need to locate your unique Windows 7product key - also known as the Windows 7 serial key,activation key, or CD key.
Normally this product key is on a sticker on your computer or located with the manual that came with Windows 7.
However, if you've lost your product key, all hope is not lost - your Windows 7 key is stored in the registry but is encrypted and not readable, making finding it difficult. Luckily there are several free programs that can help.
Important: Please read my Windows Product Keys FAQ for more information.
Difficulty: Easy
Time Required: Finding your Windows 7 product key should take less than 15 minutes

How To Find Your Windows 7 Product Key

  1. Manually locating the Windows 7 product key from the registry is nearly impossible due to the fact that it's encrypted.

    Note: The manual techniques used to locate the product key for operating systems like Windows 95 and Windows 98 will not work in Windows 7. Those manual procedures will only locate the product ID number, not the actual product key used for installation. Lucky for us, several free programs exist to help find product keys.
     
  2. Choose a free product key finder program that supports Windows 7.

    Note: Any product key finder that locates Windows 7 product keys will locate the product keys for any version of Windows 7: UltimateEnterpriseProfessional,Home PremiumHome Basic, and Starter.
     
  3. Download and run the key finder program. Follow any instructions provided by the software.
     
  4. The numbers and letters displayed by the program represent the Windows 7 product key. The product key should be formatted like xxxxx-xxxxx-xxxxx-xxxxx-xxxxx - five sets of five letters and numbers.
     
  5. Write this key code down exactly as the program displays it to you for use whenreinstalling Windows 7.

    Note: If even one character is written down incorrectly, the installation of Windows 7 that you attempt with this product key will fail. Be sure to transcribe the key exactly.

Tips & More Information

If you need to install Windows 7 but you still can't find your Windows 7 product key, even with a product key finder, you have two choices.
You can either:
  1. Request a replacement product key from Microsoft, which should cost you around $10 USD.
  2. Purchase a brand new copy of Windows 7 from TigerDirectNewEgg, or some other retailer.
Requesting a replacement Windows 7 product key is going to be cheaper but if that doesn't work out, you may in fact have to buy a new copy of Windows.

How To Create a Windows 7 Logon Password


When you start your computer, does Windows 7ask for a password? It should. If not, you need to create a password as soon as possible.
Not having a Windows 7 password is a big security concern. Without a password, anyone in your home or office has full and unrestricted access to everything on the computer. Fortunately, creating a new Windows 7 password is very simple.
Follow the steps below to create a password for your Windows 7 logon account:
Note: If you're trying to create a new Windows 7 password because you've forgotten yours and can't get in to Windows, see Tip #2 at the bottom of the page for help.
Time Required: Creating a Windows 7 password usually takes less than a few minutes
Here's How:
  1. Click on Start and then Control Panel.
  2. Click on the User Accounts and Family Safety link.
    Note: If you're viewing the Large icons or Small icons view of Control Panel, you won't see this link. Simply click on the User Accounts icon and proceed to Step 4.
  3. Click on the User Accounts link.
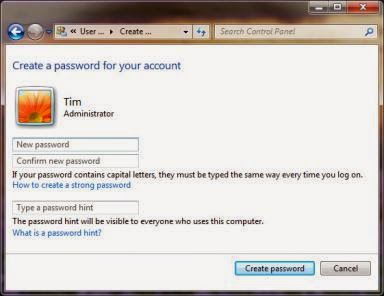
  4. In the Make changes to your user account area of the User Accounts window, click theCreate a password for your account link.
  5. In the first two text boxes, enter the password you would like to start using.
    Entering the password twice helps to make sure that you typed your new password correctly.
  6. In the final text box, you're asked to Type a password hint.
    This step is optional but I highly recommend that you use it. If you try logging in to Windows 7 but enter the wrong password, this hint will pop up, hopefully jogging your memory.
  7. Click the Create password button to confirm your new password.
  8. You can now close the User Accounts window.
  9. Now that your Windows 7 account has a password setup, you must use this password to log on to Windows 7 from this point forward.
  10. Create a Windows 7 password reset disk. While not a required part of creating a new password, I highly recommend that you do this.
    A password reset disk will protect you from the consequences of forgetting your new Windows 7 password.
Tips:
  1. Not a Windows 7 user? See How Do I Create a Password in Windows? for specific instructions for your version of Windows.
  2. If you need a new Windows 7 password because you've forgotten yours and can no longer access Windows, then you obviously can't use the method above.
    You can, however, use a free Windows password recovery program to crack or reset the password even if you can't get in to Windows 7 at all. You can then create a new Windows 7 password using the instructions above.

Google language translation

How To Fix D3dx9_34.dll Not Found or Missing Errors


D3dx9_34.dll Error Messages
There are quite a few different ways that d3dx9_34.dll errors may show up on your computer. Some of the more common d3dx9_34.dll error messages are listed below:
  • "D3DX9_34.DLL Not Found"
     
  • "File d3dx9_34.dll not found"
     
  • "The file d3dx9_34.dll is missing"
     
  • "D3DX9_34.DLL is missing. Replace D3DX9_34.DLL and try again."
     
  • "D3dx9_34.dll not found. Reinstalling might help fix this."
     
  • "This application has failed to start because d3dx9_34.dll could not be found!"
In non-game applications, a d3dx9_34.dll error might appear before the program starts or before certain advanced graphics features of the program are used.

Cause of D3dx9_34.dll Errors

D3dx9_34.dll issues are caused in one way or another by a single issue - a problem with Microsoft DirectX.
The d3dx9_34.dll file is one of many files contained in the DirectX software package. Since DirectX is used by most Windows based games and graphics programs, d3dx9_34.dll errors usually show up only when using these programs.

Don't Want to Fix This Yourself?

If you're interested in fixing this problem yourself, continue with the troubleshooting in the next section.
Otherwise, see How Do I Get My Computer Fixed? for a full list of your support options, plus help with everything along the way like figuring out repair costs, getting your files off, choosing a repair service, and a whole lot more.

How to Fix D3dx9_34.dll Errors

Important Note: Do not, under any circumstances, download the d3dx9_34.dll DLL filefrom any "DLL download site." There are a many different reasons that downloading DLLs from these sites are never a good idea.
Note: If you've already downloaded d3dx9_34.dll from one of those DLL download sites, remove it from wherever you put it and continue with the following steps.
  1. Restart your computer if you haven't yet done so.

    The d3dx9_34.dll error might be a one-time issue and a restart could clear it up completely. It's unlikely this will fix the problem, but restarting is always a good first troubleshooting step.
     
  2. Install the latest version of Microsoft DirectX. Chances are, upgrading to the latest version of DirectX will fix the d3dx9_34.dll not found error.

    Note: Microsoft often releases updates to DirectX without updating the version number or letter so be sure to install the latest release even if your version is technically the same.

    Note: The same DirectX installation program works with all versions of Windows including Windows 7, 8, Vista, XP, and more. It will replace any missing DirectX 11, DirectX 10, or DirectX 9 file.
     
  3. Assuming the latest DirectX version from Microsoft doesn't fix the d3dx9_34.dll error you're receiving, look for a DirectX installation program on your game or application CD or DVD. Most likely, if a game or other program utilizes DirectX, the software developers will include a copy of DirectX on the installation disc.

    Sometimes, though not often, the DirectX version included on the disc is a better fit for the program than the latest version available online.
     
  4. Uninstall the game or software program and then reinstall it again. Something may have happened to the files in the program that work with d3dx9_34.dll and a reinstall could do the trick.
     
  5. Restore the d3dx9_34.dll file from the latest DirectX package. If the above troubleshooting steps haven't worked to solve your d3dx9_34.dll error, try extracting the d3dx9_34.dll file individually from the DirectX package.
     
  6. Update the drivers for your video card. While it's not the most common solution, in some situations updating the drivers for the video card in your computer could correct this DirectX issue.

Applies To

The d3dx9_34.dll error message could apply to any program that utilizes Microsoft DirectX, most commonly video games.
Some common games that have been known to generate d3dx9_34.dll errors include Call of Duty 4: Modern Warfare, Crysis, Need for Speed Pro Street, Project 64 (a N64 emulator), Blazing Angels: Squadrons of WWII, Savage 2: A Tortured Soul, and more.
Any of Microsoft's operating systems since Windows 98 may be affected by d3dx9_34.dll and other DirectX issues. This includes Windows 8Windows 7Windows VistaWindows XP, and Windows 2000.

Still Having D3dx9_34.dll Issues?

See Get More Help for information about contacting me on social networks or via email, posting on tech support forums, and more. Be sure to let me know the exact d3dx9_34.dll error message that you're receiving and what steps, if any, you've already taken to resolve it.

Call of Duty: Advanced Warfare - How to fix bink2w64.dll

Error short name : bink2w64.dll is missing from your computer
Repair Call of Duty: Advanced Warfare. Hello and Welcome. If you want to play this nice video game Call of Duty: Advanced Warfare but you can`t because you get the annoying error : The program can`t start because bink2w64.dll is missing from your computer. then first suggestion would be to reinstall video game to fix this, but try with antivirus turned off (unplug internet connection while do this) and the missing file bink2w64.dll will be installed from game package.
.

Call of Duty: Advanced Warfare

Recommended solution :
Our Recommendation to fix Call of Duty: Advanced Warfare bink2w64.dll is missing is to reinstall the game.
Why ? because maybe your antivirus see bink2w64.dll as a virus !! (and maybe is if you downloaded game from torrents)
Second Fix will be:
1. Open your Antivirus. Look for Tools or Settings.
2. Now look careful for Quarantine files.
3. Open Quarantine and if file bink2w64.dll is in quarantine, turn off your antivirus (stop protection) then download and install our recommended antivirus from above and scan your system.
Now with your antivirus stopped and with our recommended antivirus started, restore bink2w64.dll files from quarantine and if antivirus says that is infected, then delete that file and your game package is infected !
Because the game archive have bink2w64.dll file included in package !
- See more at: http://www.techgzone.com/fix-this-game/advanced-warfare/call-of-duty-advanced-warfare-how-to-fix-bink2w64-dll.html#sthash.Nhb1rNux.dpuf

Error details:

The program can`t start because bink2w64.dll is missing from your computer.
Try reinstalling the program to fix this problem
Video Game Call of Duty: Advanced Warfare - Fix bink2w64.dll is missing from your computer, Call of Duty: Advanced Warfare bink2w64.dll error, bink64 download, Call of Duty: Advanced Warfare bink2 missing, Call of Duty: Advanced Warfare bink2w64 critical error, bink2w64.dll is not available.
Where is the file bink2w64.dll for game Call of Duty: Advanced Warfare ?
Article posted by Sorin B.
The program can`t start because bink2w64.dll is missing from your computer.
- See more at: http://www.techgzone.com/fix-this-game/advanced-warfare/call-of-duty-advanced-warfare-how-to-fix-bink2w64-dll.html#sthash.Nhb1rNux.dpuf